2003 Toxic Tacoma
-
ToxicGumbo
- LQFP144 - On Top Of The Game
- Posts: 474
- Joined: Tue Jan 03, 2012 8:37 pm
- Location: Manhattan, KS. USA
Re: 2003 Toxic Tacoma
At the time, the above was created just for data visualization and destined for an as-yet-unpurchased HDMI display. I have a far different concept in mind which requires the assistance of the Pi as the HMI component.
FreeEMS vehicle #23: 2003 Toyota "Toxic" Tacoma
Build page: http://forum.diyefi.org/viewtopic.php?f=3&t=1635)
Build page: http://forum.diyefi.org/viewtopic.php?f=3&t=1635)
-
ToxicGumbo
- LQFP144 - On Top Of The Game
- Posts: 474
- Joined: Tue Jan 03, 2012 8:37 pm
- Location: Manhattan, KS. USA
Re: 2003 Toxic Tacoma
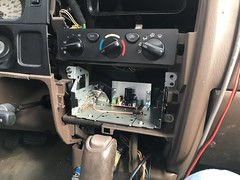
I've been really tied up with work and family responsibilities, but have been able to get some work done on the truck during lunch breaks--both in the parking lot and the basement of the building I work in. It's nice having an area that no one casually visits and has a kick ass domestic vise bolted to metal table (which is turn is bolted to the concrete floor). No power outlets near the bench though. 
As far as progress, the gamechanger, for me, was one motivated by finances. I normally shelve OEM parts should the need to reverse change arise, but I simply couldn't afford a new radio or gauge cluster (on a family budget) and decided to rip the originals apart, focusing finances on cheap cables, adapters, etc. Things are moving glacially, but are very close to being done.
Here are some photos, minus the latest changes.
^ One of the priorities has been to introduce CAN support. With the OEM ECU out, I can still using the original OBD-II wiring for powering hooked up devices. This $12 Amazon Y-adapter conveniently comes with a bracket that matches the OEM spot perfectly (the original cable had the bracket built in). I simply unscrewed and coiled up the original cable and installed this one in its place. The other end is a DB9 connector that will go into he PiCAN2 board. Because of vibration, I'll likely run the necessary wiring from the PiCAN2 screw terminals to a DB9 connector fixed to the chassis. As far as actual CAN communication, this will be based on recording requests from gauges for OBD-II stats and, eventually, returning properly formatted FreeEMS values.
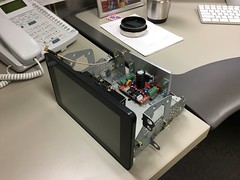
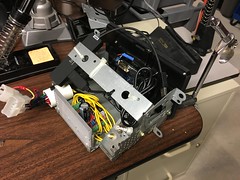
^ Here's the old radio base with sidewalls and brackets. I threw in a $13 Chinese amplifier off eBay, the only one I could find with a common audio jack. It's bolted to an $8 aluminum heat sink off of Amazon, which is held in place with some Home Depot brackets. The sidewalls were so shaky without the rest of the case bolting them into place that I made some really crappy Harbor Freight 115V flux core welds. The Pi attaches to the brackets through industrial strength Velcro. That might sound sketchy, but it adds some shock absorption, allows me to keep the Pi and fragile screen in a case, and is easy to deal with for removal of the Pi for whatever reason. Though not shown, the bottom of the Pi case also has Velcro and I modified the radio floor to lower the Pi slightly. You can also see a Home Depot fence bracket that holds a BNC-to-IPX adapter for the Software Defined Radio dongle. I went with BNC since I have yet to find a simple "car radio antenna banana plug to IPX" converter. However, after massive searching, I did find a trucker adapter for BNC called "TruckSpec TSAD-551" and now have that eternally wedged on my radio antenna end.
^ Test fit of the old radio case in the waterfall area. Note that the antenna bracket needed to be bent to clear the HVAC air routing.

^ Test fit of the Pi screen. Nearly perfect!
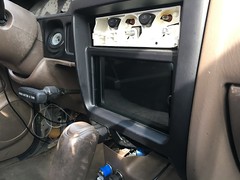
^ Loosely-attached bezel for overall test fit. The Pi screen sits up a little high, but everything is so close to being perfectly aligned that it's not worth fighting. As mentioned, I made some changes to drop it a little, but anything further will weaken the bezel assembly and complicate the overall fitment.
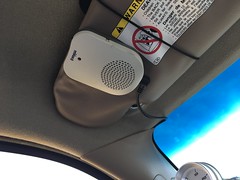
^ One of my hopes is to use voice control. There are a few decent options under Linux, though some are for actual application handling while others are more academic and require a constant internet connection. Since I want to rely on tethering to my cellphone at all times for realtime data and streaming, I'll likely experiment with both. This sound conditioning mic/speaker will also be used for hands-free cellphone conversations, required by law in this town while driving. I will need a strategically placed button to eventually do the voice control if not "always on". I had this microphone for many years and never really used it, so I bought a garage door opener clip, zip-tied it extremely tight through the back plastic, and ran a $4.50 StarTech USB cable through the A-pillar down to the Pi location.
^ Here's the case wired up for audio and TTL operation. The yellow wire is more cheap Harbor Freight goodness. I didn't want cabling issues with the metal edge of the case, so I bought a PVC coupler for $1 and screwed that down, ran a $5 Scosche radio harness through it, and now have four speakers wired up and ignition-controlled power. One line for the radio always receives battery, so I have that ready for Pi loss-of-power detect powerdowns. It's not an ideal gauge for use, but the power downs are brief that I'm not too concerned. Worst case, at idle I expect no more than 2A between screen and Pi (note that the hub and most devices will be powered independently).
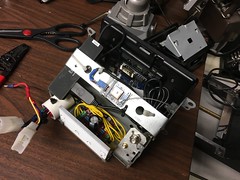
^ Same view with AdaFruit's $40 GPS installed to the TTL/USB adapter. Also note that the GPS antenna wiring is in place. I had an old antenna which used a bizarre adapter that I couldn't find anywhere, so I chopped that and crimped on an SMA adapter using pliers. The funny thing that shows how cheap things are these days: the cable ends consisted of 4x SMA adapters and cost $0.98 USD with free shipping from China. Less than $1 for parts shipped across the world. Crazy. The antenna's magnetically mounted to my CB on top of the dash and runs through to the Pi location.
In those last two images, the metal bracket across the top cost about $1.25 and is also for wooden fences. I bent the ends on a vise and found existing holes matched some prongs on my case perfectly. I then drilled some screw holes, fixed it in place, then 3M double-stick taped a $12 powered 4-port Amazon hub and SDR dongle underneath it. The hub power will always be dependent on ignition key-on state.
As far as progress, the gamechanger, for me, was one motivated by finances. I normally shelve OEM parts should the need to reverse change arise, but I simply couldn't afford a new radio or gauge cluster (on a family budget) and decided to rip the originals apart, focusing finances on cheap cables, adapters, etc. Things are moving glacially, but are very close to being done.
Here are some photos, minus the latest changes.
^ One of the priorities has been to introduce CAN support. With the OEM ECU out, I can still using the original OBD-II wiring for powering hooked up devices. This $12 Amazon Y-adapter conveniently comes with a bracket that matches the OEM spot perfectly (the original cable had the bracket built in). I simply unscrewed and coiled up the original cable and installed this one in its place. The other end is a DB9 connector that will go into he PiCAN2 board. Because of vibration, I'll likely run the necessary wiring from the PiCAN2 screw terminals to a DB9 connector fixed to the chassis. As far as actual CAN communication, this will be based on recording requests from gauges for OBD-II stats and, eventually, returning properly formatted FreeEMS values.
^ Here's the old radio base with sidewalls and brackets. I threw in a $13 Chinese amplifier off eBay, the only one I could find with a common audio jack. It's bolted to an $8 aluminum heat sink off of Amazon, which is held in place with some Home Depot brackets. The sidewalls were so shaky without the rest of the case bolting them into place that I made some really crappy Harbor Freight 115V flux core welds. The Pi attaches to the brackets through industrial strength Velcro. That might sound sketchy, but it adds some shock absorption, allows me to keep the Pi and fragile screen in a case, and is easy to deal with for removal of the Pi for whatever reason. Though not shown, the bottom of the Pi case also has Velcro and I modified the radio floor to lower the Pi slightly. You can also see a Home Depot fence bracket that holds a BNC-to-IPX adapter for the Software Defined Radio dongle. I went with BNC since I have yet to find a simple "car radio antenna banana plug to IPX" converter. However, after massive searching, I did find a trucker adapter for BNC called "TruckSpec TSAD-551" and now have that eternally wedged on my radio antenna end.
^ Test fit of the old radio case in the waterfall area. Note that the antenna bracket needed to be bent to clear the HVAC air routing.
^ Test fit of the Pi screen. Nearly perfect!
^ Loosely-attached bezel for overall test fit. The Pi screen sits up a little high, but everything is so close to being perfectly aligned that it's not worth fighting. As mentioned, I made some changes to drop it a little, but anything further will weaken the bezel assembly and complicate the overall fitment.
^ One of my hopes is to use voice control. There are a few decent options under Linux, though some are for actual application handling while others are more academic and require a constant internet connection. Since I want to rely on tethering to my cellphone at all times for realtime data and streaming, I'll likely experiment with both. This sound conditioning mic/speaker will also be used for hands-free cellphone conversations, required by law in this town while driving. I will need a strategically placed button to eventually do the voice control if not "always on". I had this microphone for many years and never really used it, so I bought a garage door opener clip, zip-tied it extremely tight through the back plastic, and ran a $4.50 StarTech USB cable through the A-pillar down to the Pi location.
^ Here's the case wired up for audio and TTL operation. The yellow wire is more cheap Harbor Freight goodness. I didn't want cabling issues with the metal edge of the case, so I bought a PVC coupler for $1 and screwed that down, ran a $5 Scosche radio harness through it, and now have four speakers wired up and ignition-controlled power. One line for the radio always receives battery, so I have that ready for Pi loss-of-power detect powerdowns. It's not an ideal gauge for use, but the power downs are brief that I'm not too concerned. Worst case, at idle I expect no more than 2A between screen and Pi (note that the hub and most devices will be powered independently).
^ Same view with AdaFruit's $40 GPS installed to the TTL/USB adapter. Also note that the GPS antenna wiring is in place. I had an old antenna which used a bizarre adapter that I couldn't find anywhere, so I chopped that and crimped on an SMA adapter using pliers. The funny thing that shows how cheap things are these days: the cable ends consisted of 4x SMA adapters and cost $0.98 USD with free shipping from China. Less than $1 for parts shipped across the world. Crazy. The antenna's magnetically mounted to my CB on top of the dash and runs through to the Pi location.
In those last two images, the metal bracket across the top cost about $1.25 and is also for wooden fences. I bent the ends on a vise and found existing holes matched some prongs on my case perfectly. I then drilled some screw holes, fixed it in place, then 3M double-stick taped a $12 powered 4-port Amazon hub and SDR dongle underneath it. The hub power will always be dependent on ignition key-on state.
FreeEMS vehicle #23: 2003 Toyota "Toxic" Tacoma
Build page: http://forum.diyefi.org/viewtopic.php?f=3&t=1635)
Build page: http://forum.diyefi.org/viewtopic.php?f=3&t=1635)
-
ToxicGumbo
- LQFP144 - On Top Of The Game
- Posts: 474
- Joined: Tue Jan 03, 2012 8:37 pm
- Location: Manhattan, KS. USA
Re: 2003 Toxic Tacoma
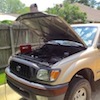
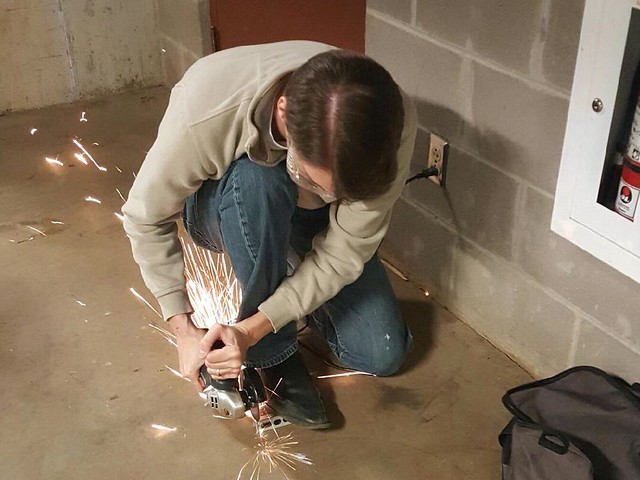
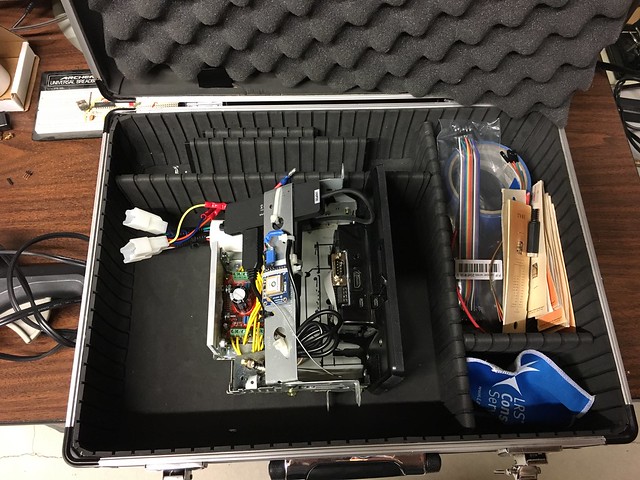
This is pretty much how I spend my lunch breaks these days:
FreeEMS vehicle #23: 2003 Toyota "Toxic" Tacoma
Build page: http://forum.diyefi.org/viewtopic.php?f=3&t=1635)
Build page: http://forum.diyefi.org/viewtopic.php?f=3&t=1635)

Re: 2003 Toxic Tacoma
On behalf of your engine, and half a bottle of caravan petite syrah, I'm personally offended by the above two posts.
On my own behalf, it's pretty awesome and looks like a fair bit of fun.
Angle grinding at lunch time would be good, esp if you can imagine the face of an unloved colleague at the time.
On my own behalf, it's pretty awesome and looks like a fair bit of fun.
Angle grinding at lunch time would be good, esp if you can imagine the face of an unloved colleague at the time.
DIYEFI.org - where Open Source means Open Source, and Free means Freedom
FreeEMS.org - the open source engine management system
FreeEMS dev diary and its comments thread and my turbo truck!
n00bs, do NOT PM or email tech questions! Use the forum!
The ever growing list of FreeEMS success stories!
FreeEMS.org - the open source engine management system
FreeEMS dev diary and its comments thread and my turbo truck!
n00bs, do NOT PM or email tech questions! Use the forum!
The ever growing list of FreeEMS success stories!
-
ToxicGumbo
- LQFP144 - On Top Of The Game
- Posts: 474
- Joined: Tue Jan 03, 2012 8:37 pm
- Location: Manhattan, KS. USA
Re: 2003 Toxic Tacoma
It's ironic that you provided me some test material at the same time I clipped the wired switch leading back to my Jaguar's run/load jumper. I can twist the wires together, but am genuinely close to making this usable and right before the weather turns oppressively cold.
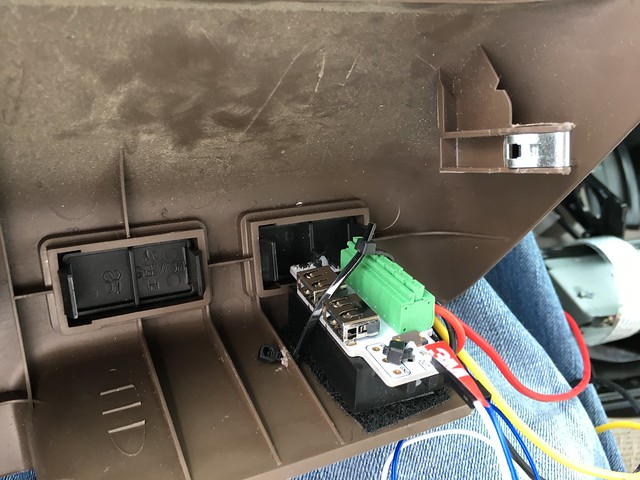
Here's what I was cutting. It could have turned out looking much nicer, but in the end I had to take whatever I could find around me to get it together. I've set daily objectives and will produce junk rather than nothing at all.
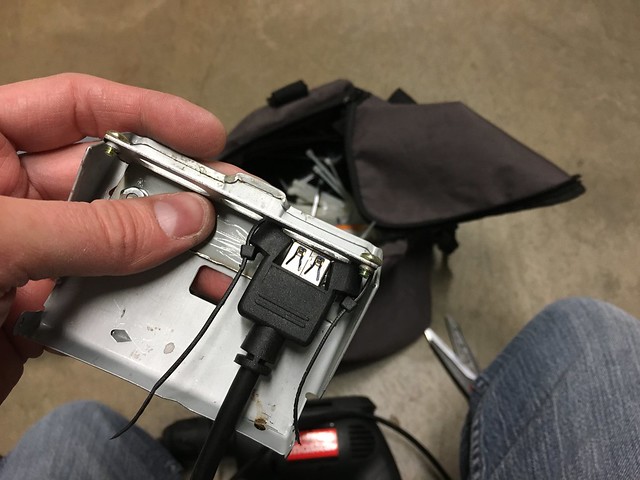
^ Expanding ashtray top with USB extension for flash drives, etc.
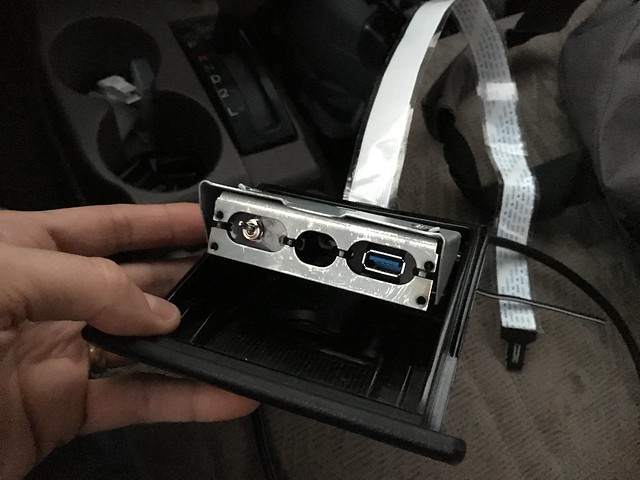
^ Expanding ashtray with USB and firmware switch. Might put a reset button in the middle for the Pi.
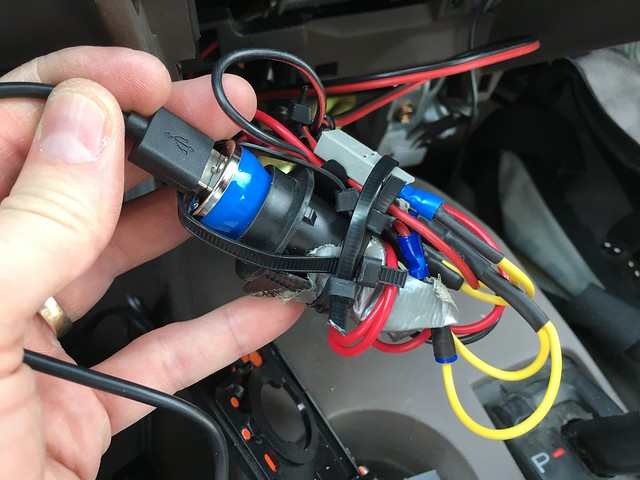
Today: Route power wiring and put in one-half of a disconnect on the run/load switch. That half is a male mono-audio plug and I currently have no clue where a socket is, but will likely chop one off of something back home.
Here's what I was cutting. It could have turned out looking much nicer, but in the end I had to take whatever I could find around me to get it together. I've set daily objectives and will produce junk rather than nothing at all.
^ Expanding ashtray top with USB extension for flash drives, etc.
^ Expanding ashtray with USB and firmware switch. Might put a reset button in the middle for the Pi.
Today: Route power wiring and put in one-half of a disconnect on the run/load switch. That half is a male mono-audio plug and I currently have no clue where a socket is, but will likely chop one off of something back home.
FreeEMS vehicle #23: 2003 Toyota "Toxic" Tacoma
Build page: http://forum.diyefi.org/viewtopic.php?f=3&t=1635)
Build page: http://forum.diyefi.org/viewtopic.php?f=3&t=1635)

Re: 2003 Toxic Tacoma
I love it Jeff  The grinding in your work break, the brackets, doing it the way you can instead of don't doing it because it is not according rules of the internet opinion
Are you planning on implementing OBD2 on FreeEMS and then running an off the shelf ODB2-app on your Pi?
Are you planning on implementing OBD2 on FreeEMS and then running an off the shelf ODB2-app on your Pi?
-
ToxicGumbo
- LQFP144 - On Top Of The Game
- Posts: 474
- Joined: Tue Jan 03, 2012 8:37 pm
- Location: Manhattan, KS. USA
Re: 2003 Toxic Tacoma
Thanks, Matthijs. As I believe Fred once said, proper support for OBD-II and diagnostics needs to be written in (and not through small effort), but I do ignorantly think data requests for stats can be hotwired to use existing comms data.
I have a pair of Aeroforce Interceptor gauges which have configurable alerts which I'd like to eventually use.
As for software on the Pi, of all the projects I've seen, pyOBD seems to be the most stable and no-nonsense at this time.
Edit: pyOBD URL: http://www.obdtester.com/pyobd
I have a pair of Aeroforce Interceptor gauges which have configurable alerts which I'd like to eventually use.
As for software on the Pi, of all the projects I've seen, pyOBD seems to be the most stable and no-nonsense at this time.
Edit: pyOBD URL: http://www.obdtester.com/pyobd
FreeEMS vehicle #23: 2003 Toyota "Toxic" Tacoma
Build page: http://forum.diyefi.org/viewtopic.php?f=3&t=1635)
Build page: http://forum.diyefi.org/viewtopic.php?f=3&t=1635)
Re: 2003 Toxic Tacoma
Some alternatives that I found when searching for pyobd on pypi for the pi as a joke post: https://brendanwhitfield.wordpress.com/ ... ython-obd/
DIYEFI.org - where Open Source means Open Source, and Free means Freedom
FreeEMS.org - the open source engine management system
FreeEMS dev diary and its comments thread and my turbo truck!
n00bs, do NOT PM or email tech questions! Use the forum!
The ever growing list of FreeEMS success stories!
FreeEMS.org - the open source engine management system
FreeEMS dev diary and its comments thread and my turbo truck!
n00bs, do NOT PM or email tech questions! Use the forum!
The ever growing list of FreeEMS success stories!
-
ToxicGumbo
- LQFP144 - On Top Of The Game
- Posts: 474
- Joined: Tue Jan 03, 2012 8:37 pm
- Location: Manhattan, KS. USA
Re: 2003 Toxic Tacoma
Nice find, Fred. He makes a really good point about the lack of a backend communications component. Thanks for posting that.Fred wrote:Some alternatives that I found when searching for pyobd on pypi for the pi as a joke post: https://brendanwhitfield.wordpress.com/ ... ython-obd/
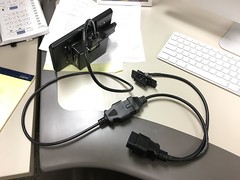
My final package showed up it the mail last night--3x USB cables--so I spent my lunch break not eating again in hopes of getting the power distribution handled. Every morning before leaving for work, I run down a checklist of parts I'll need (ie. spare cigarette lighter socket, zip ties, butane soldering iron, Velcro, etc.) and hope nothing was forgotten. Consequentially, everything I need at this point has gathered in the passenger footwell over a period of days.
However, that doesn't mean that crap like this doesn't happen...
^ Not my finest work, but at least the hub and CB work.
There are better ways to do the above, but I'm really on minimal time and just want it done. The Garmin USB adapter will handle up to 1A and the hub only has a GPS card and SDR dongle. I'll check their reported values once everything's in place and, worst case, can handle this differently. What you're actually looking at is:
Cigarette lighter wiring -> Y-cabling: (1. Garmin USB adapter, 2. Colt CB)
Here's the other cigarette lighter wiring re-routed for the 3A, dual-USB failover device:
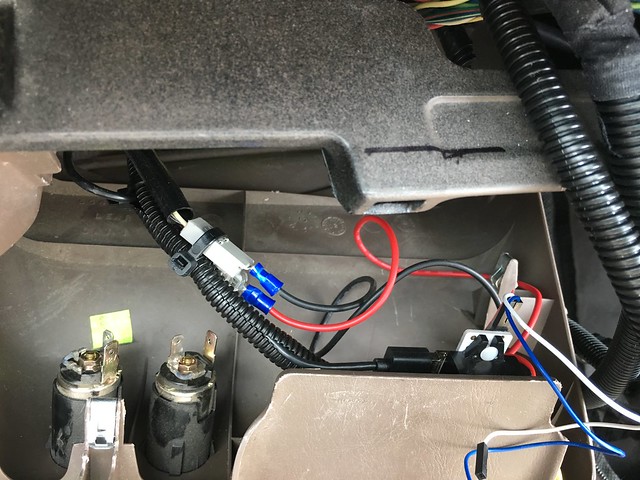
^ There's a yellow cable out of view which goes back to the radio always-on wire. You can see the old cigarette lighter sockets to the left.
^ The Mausberry Circuits car USB adapter has to sit upside down (that was literally the last place I could fit the thing), so I used both velcro to provide some shock padding and put a slack zip-tie lasso around it just to keep vibrations from easily loosening the Velcro over time and dropping everything onto metal dash supports.
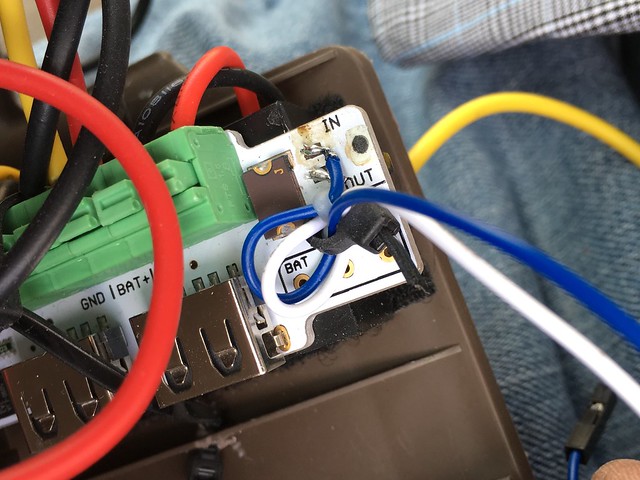
^ The worst thing to happen was right before returning to work: I thought the header for the Pi GPIO wiring was through-hole and I ended up snapping it off. To be honest, I don't mind too much because it stuck out just a few mm too far and kept the cover panel from sitting flush. However, I had to do some emergency soldering and there really wasn't anything left of the surface mount pads. It'll do for a GPIO signal, but not ideal at all. To stress-fit the wires into place, I ran them through the plastic pushpin holding that side together and forced a zip-tie in to make everything more rigid. It looks really loose, but that last bend of the wires before they disappear to the right is where the movement more or less tapers off. I wouldn't buy this device again for a number of reasons, but at least it's in place.
With the bottom back in place, I'm left to concentrate on the final Pi install, extending the GPIO wires, getting the firmware switch to connect to the other end, and extend the yellow power wire a bit further.
FreeEMS vehicle #23: 2003 Toyota "Toxic" Tacoma
Build page: http://forum.diyefi.org/viewtopic.php?f=3&t=1635)
Build page: http://forum.diyefi.org/viewtopic.php?f=3&t=1635)
-
ToxicGumbo
- LQFP144 - On Top Of The Game
- Posts: 474
- Joined: Tue Jan 03, 2012 8:37 pm
- Location: Manhattan, KS. USA
Re: 2003 Toxic Tacoma
All the remaining parts I needed for install magically turned up in 10 minutes after searching off and on for days. Today was going to be install day....but I had to chop the workday in half and will be taking my oldest to the dentist in a neighboring town, then a few stops on the way home. So no spare time, but at least everything is prepped and I have an order-of-battle checklist on the phone.
FreeEMS vehicle #23: 2003 Toyota "Toxic" Tacoma
Build page: http://forum.diyefi.org/viewtopic.php?f=3&t=1635)
Build page: http://forum.diyefi.org/viewtopic.php?f=3&t=1635)