'81 Mini Clubman Estate

Post your project vehicles here! One thread per vehicle please.
ehb
LQFP112 - Up with the play
Posts: 128
Joined: Tue Dec 23, 2008 12:20 am

Re: '81 Mini Clubman Estate

Post by ehb »

Well, while waiting for parts (and a new hydraulic press) to be delivered, I thought, let's shave another yak.

I couldn't get the quickshift off of the gearlever housing, so I took it out of the car. Before opening, I gave it a quick clean (with WD40, my handy dentist tool and some rags).
IMG_20160813_214813.small.jpg
While disassembling, the wear showed:
IMG_20160813_214925.small.jpg
IMG_20160813_214837.jpg
And the worst, which gives it lots of play:
IMG_20160813_215044.small.jpg
I'll probably turn that out on the lathe and make a bush out of bearing bronze. Also a longer bronze bushing for the gear change rod above that has a wider contact area.
The ball at the end of the gear lever of the new quickshift is made from some kind of plastic, so I guess some day it will have to be replaced. The old one was made of steel (I think), which wore out the "gear lever extension rod eye" (I had to look that up).

Still need to get the blue part off. Easy job on the press...
KLAS
DIP8 - Involved
Posts: 16
Joined: Tue Jun 18, 2013 8:54 pm

Re: '81 Mini Clubman Estate

Post by KLAS »

long time ago i fitted one gear lever box with linear ball bearings for the selector rod. was much better than any plain bearing but a pain to find matching imperial bearings. if i would ever do that again i would make it metric.
maybe an idea for you, for long, cold evenings
ehb
LQFP112 - Up with the play
Posts: 128
Joined: Tue Dec 23, 2008 12:20 am

Re: '81 Mini Clubman Estate

Post by ehb »

That's actually a good idea, never heard of it. Yes, I also just realized the rod is 1/2 inch. I briefly thought about making a new one, but I don't have the right stock and also, it can be turned around, so the worn area is switched to where it doesn't matter. That's pretty cool.
Now I only need to figure out how to make 12.6 mm inner diameter on the lathe... and I need bronze.

I removed from the eye what was worn out (clearly to be seen) using the 4-jaw chuck:
IMG_20160814_182116.small.jpg
Great quality aluminium, with steel bushing to the right:
IMG_20160814_183017.small.jpg
I pressed in the steel sleeve, re-dialed in the piece on the lathe and turned the inner diameter to 22.2 mm, so the plastic end ball fits very snugly:
IMG_20160814_215429.small.jpg
I'm happy with the result and since the ball is plastic (I hope PTFE), steel is a fine partner (instead of bronze).
I wonder why they kept the cable strands on there. Will need to cut those very closely.

I now ordered a reverse gear switch. I don't have a reverse light, but a beeper, like from heavy machinery. That'll be fun, I guess? :)
ehb
LQFP112 - Up with the play
Posts: 128
Joined: Tue Dec 23, 2008 12:20 am

Re: '81 Mini Clubman Estate

Post by ehb »

Work on the gear lever box has escalated, but I think I got it under control by now. I received and assembled my new Chinese shop press. Quite good for the price, about what I expected. Needs some tuning.

I've got pictures of most of the work, but not sure if Fred likes my habit of uploading them here. ;) Or if it's even of interest...
Here's what got done:
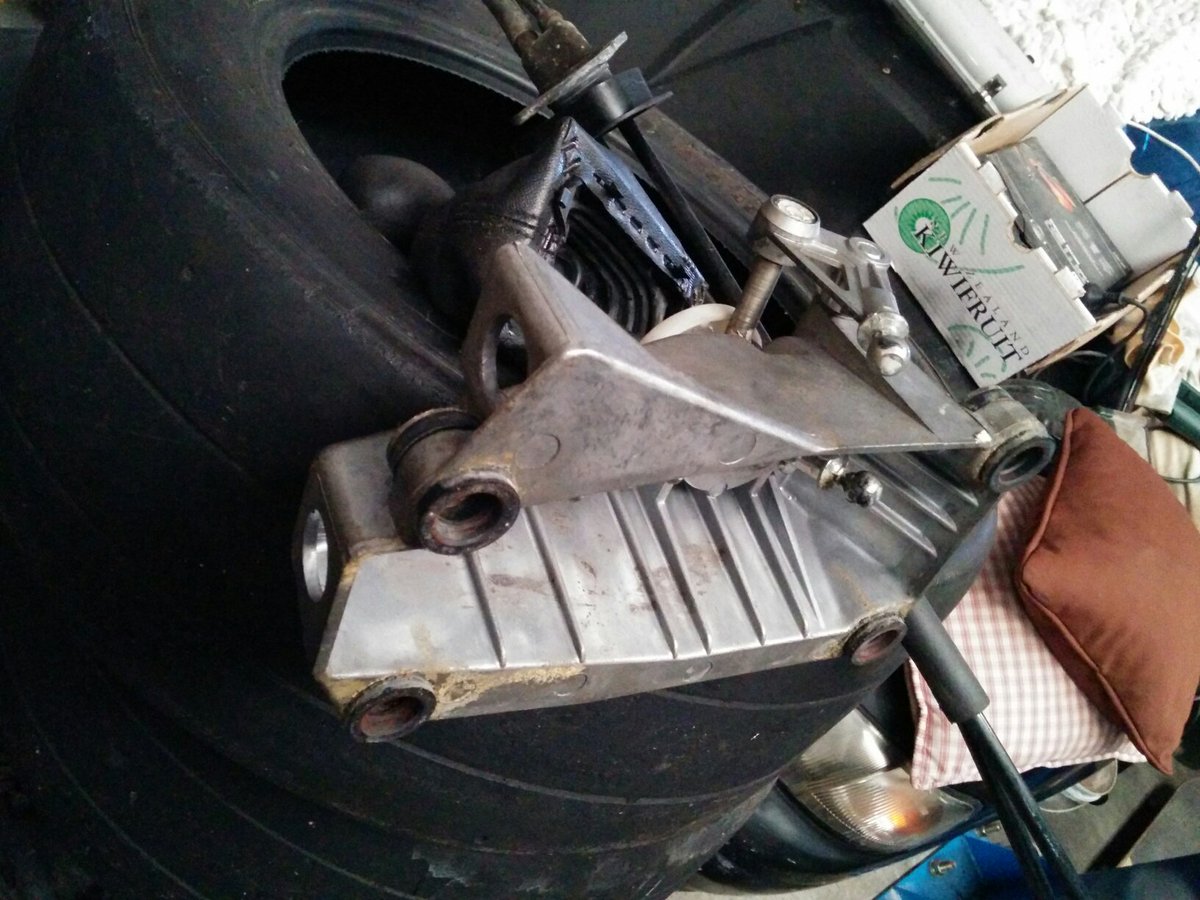
- Realized the lever was hitting the casing on the inside. Milled away 3 mm inside, then put the casing in the 4-jaw-chuck and turned away more. The lever moves freely everywhere now, which I guess, is what's intended.
- Ground down the cable strands at the end of the lever (with something akin to a Dremel tool).
- Drilled out left and right holes where the blue thing should be attached to 6 mm, countersunk to 8,3 mm. Made plugs for those points, pressed them in. Turned down the fixing screws so they have a pointy end and are much shorter.
- Got some bearing bronze, made a new very long bushing for the rod. Looks nice too (look at the left side of the casing).
- Put some PTFE in the lathe, which will replace the little plastic spacer in the center of the rag. Will finish that tomorrow, then I can assemble it all again. Hooray.
IMG_20160816_220028.small.jpg
Also, the seat consoles are coming along, now that I have a press again:
console_kit2.small.jpg
User avatar
Fred
Moderator
Posts: 15431
Joined: Tue Jan 15, 2008 2:31 pm
Location: Home sweet home!
Contact:

Re: '81 Mini Clubman Estate

Post by Fred »

Fred thinks it's a good idea, and has a fair bit of disk to spare :-) Better than the random image links that are all broken everywhere. You'll notice almost none of mine are broken because I self host the majority. There are a few. All the facebook ones die periodically - not recommended. The twitter ones seem stable so far. Some imgur stuff died, some on purpose, some by accident none mine. As you were. The forum computer will tell you 'NO' if it's not OK :-D

What material are the seat rails? Consoles again :-D When I hear that, I think PS2/XBOX :-D

I actually uploaded a pic 50% for you yesterday, so here it is, comment first:

"Volvo 850 shifter housing that could be retrofitted into anything... Such as a boat with a van gearbox,or a mini van" ;-)

Image


Cables were beefy, too. Over engineered to hell :-D
DIYEFI.org - where Open Source means Open Source, and Free means Freedom
FreeEMS.org - the open source engine management system
FreeEMS dev diary and its comments thread and my turbo truck!
n00bs, do NOT PM or email tech questions! Use the forum!
The ever growing list of FreeEMS success stories!
ehb
LQFP112 - Up with the play
Posts: 128
Joined: Tue Dec 23, 2008 12:20 am

Re: '81 Mini Clubman Estate

Post by ehb »

Wow that's a beefy shifter housing! You can clearly see the difference in swedish and british engineering mentality. :D

The seat rails (why do I even bother using a dictionary? :D ) are of mild steel, S235. I'd say that's good enough, but now I wish I had bought S355. Oh well, it will have to do now.

BTW: You're getting old when you're referring to the PS2 as console - not PS4. :D Could be worse though, I sometimes think of my old SNES. ;)

My shifter housing is now complete again, with no play and smooth movements. I'm so keen on test driving this. :) Still waiting for the tie rods, I guess they ran out of ore or something... unfortunately, the boot for the gear change rod should come with the same order.

The bronze bushing with added M4 set screw:
IMG_20160817_120121.small.jpg
Completed with everything, including new teflon spacers:
IMG_20160817_124252.small.jpg
This is where the gear lever was hitting the inside of the casing and how shows how useful a 4-jaw-chuck can be:
gear_lever_inside.small.jpg
ehb
LQFP112 - Up with the play
Posts: 128
Joined: Tue Dec 23, 2008 12:20 am

Re: '81 Mini Clubman Estate

Post by ehb »

The shifter housing is back under the car. Had to seriously bend the attaching rod so the gear selector rod moves straight with no radial load. Feels good now, really excited how it shifts. :)

Reminded by Freds crankcase pressure escapades, I checked the one crankcase breather that's easily removed. Sure enough, plugged. A tablespoon worth of grease-like gunk could be scraped out by hand and now it's soaking in lye over night:
lye_bath.small.jpg
User avatar
Fred
Moderator
Posts: 15431
Joined: Tue Jan 15, 2008 2:31 pm
Location: Home sweet home!
Contact:

Re: '81 Mini Clubman Estate

Post by Fred »

Glad your PlayStations are steel, why do they look like they're brass in the photo? I figured it was an optical illusion, or a coating, but the ends looked coloured, too, not just the flanks.

PS2 was just the vintage that I was selling them. PS3 may have come out back then, too, but PS2 is what stuck in my mind. PS1s were before I worked in retail/refail.

Bushing is pretty indeed! And I'm glad it's all tight like something that rhymes with olive oil. You'll have to give it a good thrash once the car is drivable! See if you can break it in. :-)

My breather escapades are not yet over. I have yet to update the threads, 2 or 3 days of updates pending! Perhaps today.
DIYEFI.org - where Open Source means Open Source, and Free means Freedom
FreeEMS.org - the open source engine management system
FreeEMS dev diary and its comments thread and my turbo truck!
n00bs, do NOT PM or email tech questions! Use the forum!
The ever growing list of FreeEMS success stories!
ehb
LQFP112 - Up with the play
Posts: 128
Joined: Tue Dec 23, 2008 12:20 am

Re: '81 Mini Clubman Estate

Post by ehb »

Fred wrote:Glad your PlayStations are steel, why do they look like they're brass in the photo?
I guess PlayStations = seat rails? Either way, the thought of brass Playstations and brass seat rails made me chuckle. :lol:
They probably look like that because there are very old and warm white fluorescent lamps in my shop. The "coating" is just scale, which I've just removed at the future welds.
And I'm glad it's all tight like something that rhymes with olive oil.
I have no idea what you mean, but I guess it's some profanity? :P
You'll have to give it a good thrash once the car is drivable! See if you can break it in. :-)
I'm looking forward to it :)
My breather escapades are not yet over. I have yet to update the threads, 2 or 3 days of updates pending! Perhaps today.
Too bad, I hear you. Engine compartment covered in oil residue sucks. Especially annoying since cleaning the breathers is such a cheap job...
ehb
LQFP112 - Up with the play
Posts: 128
Joined: Tue Dec 23, 2008 12:20 am

Re: '81 Mini Clubman Estate

Post by ehb »

Progress!

The breather is clean again, after I upped my game:
lye_cooked.small.jpg
The hot lye removed almost everything (including the paint), except a little greasy residue in the steel wool that's inside. Then I remembered what I use to wash out bearings: Petroleum. A sip of petroleum, a good shake and I think it's good as new now. Should've done that as first step, then the lye, but oh well... Anyways, that's what the part looked like afterwards (a thing of beauty!):
breather.small.jpg
Then there are the seat rails, which started out on the table like this:
seatrail_basis.small.JPG
It looks like a mess, but it was crucial things line up. There's something I learned today: When tack-welding, don't put the points where I did. The hot spot will cool and contract, messing up the geometry. At the second set, I tacked at the center of the flat steel braces, which had much less of an impact.

This is the status right now, test fit in the car and with the backing plates that go beneath the car:
first_fit.small.JPG
Both of them with the front mount plates:
seat_rails_set.small.jpg
In case you're wondering: Yes, the round bars are angled at 3°. And yes, they're pretty heavy, unfortunately. But they sure will make a great ride. :)

Tomorrow will be finishing all the welds and maybe even fitting them to the car.
Post Reply